Introduction
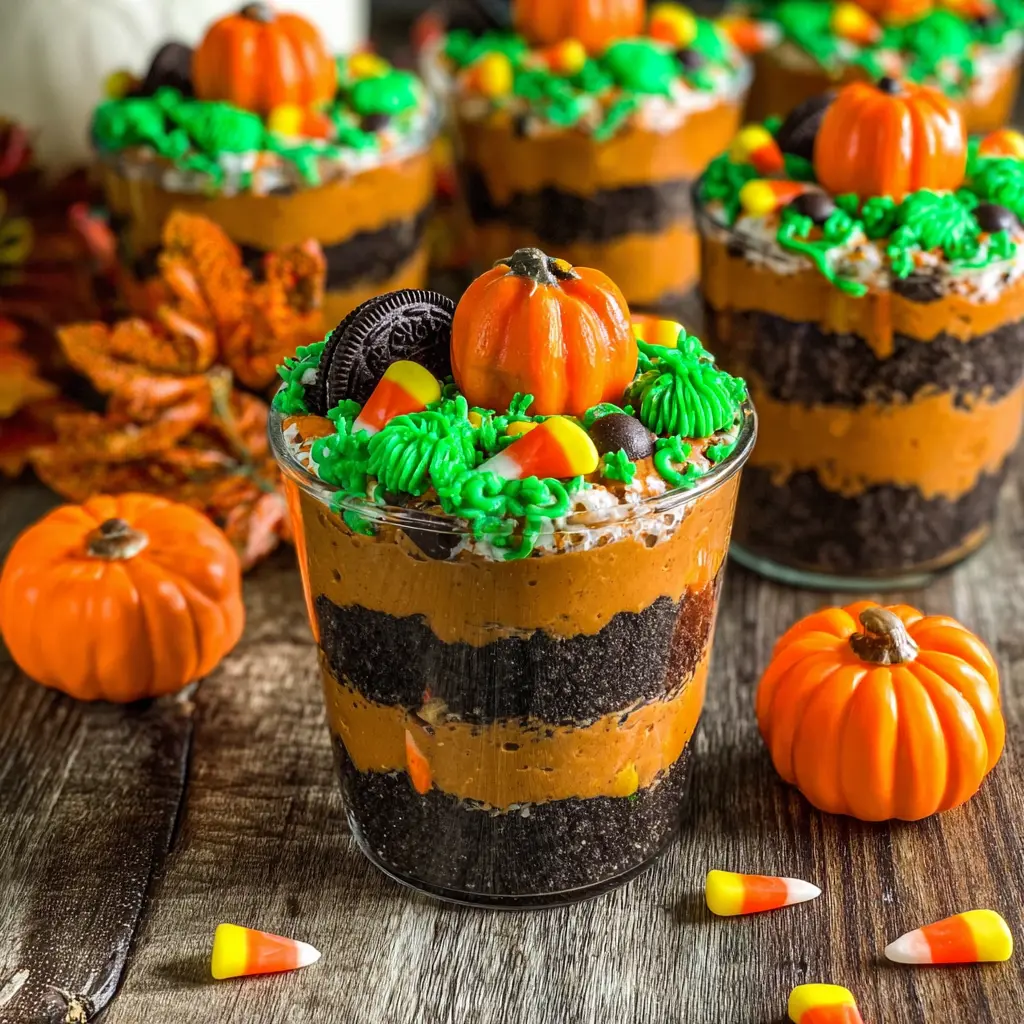
Pumpkin Patch Dirt Cups are the ultimate fall-inspired treat that brings a playful twist to dessert time. With creamy layers of chocolate pudding, fluffy whipped topping, and crushed cookies that resemble rich pumpkin patch dirt, this no-bake recipe is both easy and fun. Topped with candy pumpkins and a touch of green “vines,” each cup looks like a tiny edible pumpkin patch. Perfect for Halloween parties, Thanksgiving gatherings, or a cozy autumn night, these cups are a delightful way to celebrate the season without turning on the oven.
Table of Contents
History or Background
The idea of Pumpkin Patch Dirt Cups comes from the classic “dirt pudding” dessert, which became popular in the U.S. during the 1980s as a playful treat for kids. Traditionally made with pudding, cookies, and gummy worms, the recipe evolved into countless variations. The pumpkin patch version gives this nostalgic dessert an autumn makeover by swapping worms for candy pumpkins, making it perfect for fall holidays and seasonal parties. Over time, these cups have become a favorite no-bake recipe for families who love combining fun presentation with delicious flavor.
Why You’ll Love Pumpkin Patch Dirt Cups
Pumpkin Patch Dirt Cups are more than just cute—they’re a crowd-pleasing fall dessert with plenty of perks. First, they’re a no-bake recipe, which means no fussing with ovens or long prep times. Second, they’re kid-friendly and customizable—little hands love helping layer the pudding and sprinkling the “dirt.” Third, they’re perfect for parties, since each cup is already portioned and easy to grab. Finally, they bring a festive autumn vibe, turning simple ingredients into a dessert that looks like a real pumpkin patch. It’s a sweet blend of fun, flavor, and fall magic in every spoonful.
Ingredients for Pumpkin Patch Dirt Cups
To make these festive Pumpkin Patch Dirt Cups, you’ll only need a handful of simple ingredients:
- 2 cups cold milk – whole or 2% works best for creamy pudding.
- 1 (3.9 oz) package instant chocolate pudding mix – the base of your “dirt.”
- 1 (8 oz) container whipped topping (like Cool Whip), thawed – adds a fluffy texture.
- 1 (14 oz) package chocolate sandwich cookies (like Oreos), crushed – the dirt layer.
- 12–16 candy pumpkins – for decorating your patch.
- Green frosting or green sprinkles (optional) – to create vines or grassy accents.
- 6–8 clear plastic cups (8 oz size) – for building and serving the pumpkin patches.
These simple ingredients come together to create a dessert that looks as good as it tastes.
How to Make Pumpkin Patch Dirt Cups
Creating Pumpkin Patch Dirt Cups is quick, fun, and perfect for all ages. Here’s how to build them step by step:
- Prepare the pudding (5 minutes)
In a large bowl, whisk the chocolate pudding mix with cold milk for about 2 minutes until smooth and slightly thickened. - Fold in the whipped topping (2–3 minutes)
Gently fold the whipped topping into the pudding with a spatula. This makes the filling light and creamy. - Crush the cookies (5 minutes)
Place cookies in a zip-top bag and crush them with a rolling pin, or pulse in a food processor until crumbly. Leave a few bigger chunks for texture. - Layer the cups (5–7 minutes)
In each cup, spoon pudding, add cookie crumbs, and repeat. Finish with a cookie crumb layer on top. - Decorate (5 minutes)
Place 2–3 candy pumpkins on top. Add green frosting vines or sprinkles for extra fall flair. - Chill before serving (15–20 minutes, optional)
Refrigerate to let flavors blend and pudding set.
The result: cute little cups that look like edible pumpkin patches!

Pro Tips for Pumpkin Patch Dirt Cups
- Use clear cups for the best presentation—seeing the layers of “dirt” and pudding makes these desserts extra fun.
- Crush cookies finely but not too fine—a mix of crumbs and small chunks gives a realistic soil texture.
- Make ahead for parties—assemble the cups a few hours in advance and chill them. Just add candy pumpkins right before serving so they stay firm and bright.
Serving Ideas for Pumpkin Patch Dirt Cups
Pumpkin Patch Dirt Cups are perfect for Halloween parties, classroom treats, or Thanksgiving dessert tables. You can serve them as individual cups for easy grab-and-go snacking, or layer everything in a large glass trifle bowl for a show-stopping centerpiece. Add gummy worms for a playful “pumpkin patch critters” twist, or mix in candy corn for extra color. Pair them with hot cocoa, apple cider, or a fall-themed charcuterie board to complete your seasonal spread. These dirt cups are as fun to look at as they are to eat!
Storage Advice for Pumpkin Patch Dirt Cups
Store Pumpkin Patch Dirt Cups in the refrigerator, loosely covered with plastic wrap or lids, for up to 2–3 days. For the freshest look, add candy pumpkins and decorative toppings just before serving, since they can soften if left in the pudding too long. Freezing isn’t recommended, as the pudding and whipped topping may lose their creamy texture.

FAQs about Pumpkin Patch Dirt Cups
What is the best soil for pumpkin patches?
In gardening, pumpkins grow best in well-draining, nutrient-rich loamy soil. For dirt cups, crushed chocolate cookies make the perfect “soil” layer.
How deep does dirt need to be for pumpkins?
Pumpkin seeds need about 1–2 inches of real soil outdoors, but for dessert cups, a couple of layers of cookie crumbs and pudding is all you need to create the illusion.
How to prevent weeds in a pumpkin patch?
Gardeners often use mulch or ground cover to stop weeds. In dirt cups, no weeds—just candy pumpkins and maybe some gummy worms if you like.
Should you cover pumpkin vines with dirt?
In the garden, lightly covering vines can encourage new roots. In dessert cups, topping with cookie crumbs covers your pudding “vines” perfectly.
Find out more: Amazing Honey Garlic Chicken Breast for a Flavor-Packed Dinner
Conclusion
Pumpkin Patch Dirt Cups are a whimsical, no-bake dessert that combines chocolatey layers with festive fall decorations. Whether you’re making them for a holiday party, family gathering, or just to enjoy a seasonal treat, they’re guaranteed to delight both kids and adults. Grab your pudding, cookies, and candy pumpkins, and start building your own edible pumpkin patch today!
Print
Amazing Pumpkin Patch Dirt Cups Recipe
- Total Time: 35minutes
- Yield: 8 servings
- Diet: Vegetarian
Description
Pumpkin Patch Dirt Cups are a festive no-bake dessert with layers of creamy pudding, cookie “dirt,” and candy pumpkins that look like a mini pumpkin patch. Perfect for fall parties, Halloween, or Thanksgiving gatherings.
Ingredients
-
2 cups cold milk
-
1 (3.9 oz) package instant chocolate pudding mix
-
1 (8 oz) container whipped topping, thawed
-
1 (14 oz) package chocolate sandwich cookies, crushed
-
12–16 candy pumpkins
-
Green frosting or sprinkles (optional)
-
6–8 clear plastic cups (8 oz size)
Instructions
-
Whisk pudding mix and milk in a bowl until thickened.
-
Gently fold in whipped topping until fluffy.
-
Crush cookies into crumbs, leaving some larger chunks.
-
Layer pudding and cookie crumbs in clear cups, ending with crumbs on top.
-
Decorate with candy pumpkins and optional green frosting vines.
-
Chill for 15–20 minutes before serving.
Notes
-
Use clear cups for the best presentation.
-
Assemble ahead of time but add candy pumpkins just before serving.
-
For a twist, add gummy worms or candy corn.
- Prep Time: 15 minutes
- Cook Time: 20 minutes
- Category: Dessert
- Method: No-bake
- Cuisine: American, Fall Inspired

